Friday 17 August 2007

Ritchie's OBJ

Hello everyone! I've put a few pics for you to have a look at andrew. The connections for the snakes has turned out well. So far shes modeled, rigged up and I'm on with the texturing. I'm doing a 4k map for the body and a 4k map for the snakes and i'll downsize them when it comes to rendering. I've sent you another obj also if you could have a look for me its much appreciated. Thanks again.


Thursday 16 August 2007

Dan - Biker WIP

Hey All,

Right.......having played around with ZBrush for a bit, my attention has turned to trying to recreate the displacement in XSI with varying success. Mental Ray keeps running out of memory and crashing when you try to get the geometry resolution to go low enouth to get any of the really fine details. Either that or the wrinkles that I have added seem to inflate at rendertime.........it looks pretty wierd! At the moment I am struggling to get the pore detail on the biker's chin and head to come out. I have tried using a combination of displacement and normal maps, as well as exporting out a higher res mesh from ZBrush. The problem seems to be a Mental ray one, but it is all to possible that i have over looked something.

At the moment I am thinking of sticking with the dispacement that i have and trying to add a bum map to the mesh to hopefully get those elusive pores........does that sound like a good idea???

Also, whilst trying to give my brain a break from pondering displacements,I have started to add in some textures.......so here is some of that as well:

mesh with displacement and a normal map (normal map just taken from the last few levels of subdivision, in order to try and pick up the fine detals only.


Wednesday 15 August 2007

AM - Ollie

Hey Ollie

Malcolm is coming along nicely!
I've got a few notes for you regarding your model...

The bulge under his pectoral muscles seems a little sharp.

The waviness on the bottom of the pants seems to be incorrect. Remember that when it was made in the local sweat shop the length of the fabric would have been the same. It seems to me that you have tried to give it a natural wavy fabric appearance but in doing so you have changed the overall length instead of just scrunching up and pulling in/out. Once you apply some UV you can slap on a checker texture and make sure that there is not stretching. Also, it could really look great if you made the elastic on the short a lot tighter so that it sticks into the skin and creates an indentation.

The ankles need a little work. They are really close, but I think they would benefit from a little more attention and comparison to reference. Don't be afraid to add a little resolution here.

I have attached an image of the head with some of the areas I feel could do with some tweaks.
In order to make your life easier try and spend some time matching the camera better in XSI. Don't forget to look at the meta data on your photo and check the focal length you used, then use this in your 3D scene.


Overall though, he is looking great. There has been some good thought put into the topology and I'm sure this guy is going to look really impressive with the lighting setup you are considering.

cheers
Andrew

Tuesday 14 August 2007

AM - Emma WIP

Hey Emma

Your scene has the makings of something great and you are on the right track.
The approach you took with the ground is correct but you could save a lot of polygons by subdividing more locally to the areas you want resolution. This approach can leave the other areas very low res and light weight.
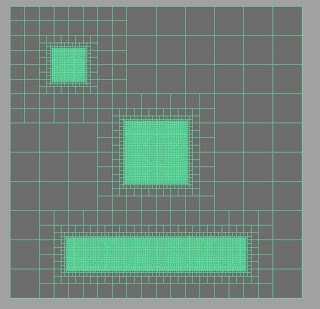

Another quick method other than using Zbrush or Mudbox would be to use procedural maps and generate a displaced ground plane to use as a starting point. You could even paint a complete environment map in Photoshop using everything from procedural maps to real world geographic maps and aeraial photographs and use this to generate a displaced ground.

If I was to do this I would create a base mesh in Maya/XSI using the local subdivision approach, then take it into Zbrush/Mudbox for additional detail. I would export a resolution that represented the overall volume and shape of the ground and output this for my scene. I would then use the remaining finer resolution divisions to use as a displacement map.

The important thing is that there are a number of ways to approach this, both procedurally and artistically but the most important thing is to put detail where you see it. At the moment your camera doesn't get too close to the ground and you could get away with just a procedural displacement on top of your current mesh.

Are you going to be matte painting in some background mountains to add depth to the final frame of your scene? It will really help the overall look and scale of the scene.

Don't be discouraged by how long the ground has taken, it is looking good and you've obviously learnt a lot from the task. Spend some time now adding a nice subtle displacement and working on an impressive shader which really helps describe the surface eg: wet, dry, mossy, dirty...

cheers
Andrew

AM - Phil WIP

Hey Phil

Your rider model is looking cool, there are some really good signs of understanding topology and anatomy. I agree with you that the head still needs a little work. I would be interested in seeing what photographic reference you are using. From the looks of things I would say you are just using the wrong camera focal length or reference which uses a wide angle lens eg:28mm

When selecting reference its best to try and find images that feel flat and have been taken with longer lenses. Most photographers will shoot with a prime lens and not a zoom which means your best options for matching a camera lens would be 28mm, 35mm, 50mm, 85mm.
When we shoot digital doubles we have a lot more control over our images and measurements are taken of everything and we create Canon lenses in Maya to match the on set camera. We also de-warp our images to completely flatten our photos to remove any distortion from the lens. It's a completely different approach when you just grab images from the web, but it's important to find images that will make your life easy.
Anyway, if possible try and get a few more images that show different angles of a female head, then try and lattice the general proportions to get a more realistic model.

The approach you are taking for the wings is a safe approach. Modeling in the veins will help if you have any close-up shots. Plus the resolution of the mesh isn't going to hurt at render time anyway. Just make sure that when you create your texture maps that you concentrate and painting a seamless blend between the modeled veins and the wing so they feel combined and natural.

cheers
Andrew

Sunday 12 August 2007

Dan - Biker ZBrush WIP

Hey Y'All,

Just been on to the blog and seen that everyone seems to have chucked some stuff on so I thought that I would do the same!! Have been playing around with ZBrush for the last few days, got pretty close to a look that I was happy with and then, when thinking that i should test it to see if it works as a displacement map I found out that my UV's had shifted slightly.........this put a tiny bit of the leg over the edge of the UV tile and made everything go mad...........so make sure that you check and double check your UV layout!!! So after spending some time working out wither I could transfer the deformation onto a new mesh, I decided that it would probably be better to start again.

So here I am, I have just overtaken the point which I had reached previously, but have built in some flexibility this time so I can tweak some of the details........3D layers are cool!!

Anywho, here are some screen grabs of the model as it stands:

Laters,

D


Phil - Wing W.I.P

Hey, heres where im at with the wings. far from complete but i managed to work out a quicker way to at least get them roughed out.


After testing dispalcements on flat planes, using alphas and bumps they all looked pretty bad.

to get the detail i want i would have to build each cell. I decided to use Zspheres in zbrush to fleshh out the shape. Heres my result:


XSI render: So heres where im at currently. I have to connect each strand where you see a gap. This is becuase you cannot weld zspheres together. So if you have the start of your zshpere chain, you cannot link it to the end. Silly! Shouldnt take long :D


heres my wire frame, this is as low as i could go in zbrush. Although i think there are some settigns where ic an reduce things, ill also try that with xsi.


Heres the preview of the geometry in zbrush. You can switch between polymesh view and the zspheres below.


These two images show the Zsphere rig. I constructed them on top of a reference dragonfly wing image.


Now im going to connect everything so its all closed and tidy it up, plus create the lower wing, which is slightly different to the top, but ill use this existing zsphere rig and move it about.

il then create two poly planes and make them the same shape and slot them in as the inner membrane, with some transparency. Fingers crossed it looks good.

Cheers


Phil.